Home Blog Page 15

DIY – Bedding in / braking in NEW Panamera brakes

beddingUntil they are bedded, brakes simply do not work as well as they can. Best time to bad in your brakes is at night on an opened road with no traffic or any cars behind you. Proper bedding improves pedal feel, reduces or eliminates brake squeal, prevents (and often cures) brake judder, reduces brake dust, and extends the life of pads and rotors.

If you just installed rotors with zinc plating or if the rotors have an anti-corrosion phosphate coating, you should postpone bedding until normal driving has allowed your pads to polish the rotors clean and removed all traces of the plating or coating. If your new brake rotors have an oily anti-corrosion coating, clean this off thoroughly with brake cleaning spray and/or hot soapy water before installation.

Caution: Immediately after installing new pads, rotors or a big brake kit, the first few applications of the brakes will result in very little braking power. Gently use the brakes a few times at low speed to build up some grip before blasting down the road at high speed. Otherwise, you may be in for a nasty surprise the first time you hit the brakes at 60 mph.

  • Warm up the brakes by driving for 10 minutes at average speeds and brake from time to time. From 60mph, gently apply the brakes a couple of times to bring them up to operating temperature. This prevents you from thermally shocking the rotors and pads in the next steps.
  • Once the brakes are warm, make eight to ten near-stops from 60 mph to 10 mph in succession with a deliberate attempt to get the brakes hot. Do it HARD by pressing the brakes firmly, but do not lock the wheels or engage ABS. At the end of each slowdown, immediately accelerate back to 60mph, then apply the brakes again. DO NOT COME TO A COMPLETE STOP! The brakes may begin to fade after the 7th or 8th near-stop. This fade will stabilize, but not completely go away until the brakes have fully cooled. Some smells may occur even slight smoke during this final heat up stage of the pads in early life.
  • Then drive the vehicle for another 10 minutes using the brakes as little as possible to allow them to cool down. Do not pull up and park vehicle with brake excessively hot. If you stop completely, with your foot on the brake pedal, pad material will be imprinted onto the hot rotors, which could lead to vibration and uneven braking.
  • When parked let brakes cool to a final cool-to-touch point. Before touching discs splash a few tiny drops of water onto the disc to asses its temperature to avoid burning fingers. If the water spots cause a “hiss” you have parked up too soon and should go out and drive slowly allowing the brakes to cool further.

After the break-in cycle, there should be a slight blue tint and a light gray film on each rotor face. The blue tint tells you the rotor has reached break-in temperature and the gray film is pad material starting to transfer onto the rotor face. This is what you are looking for. The best braking occurs when there is an even layer of of pad material deposited across the rotors. This minimizes squealing, increases braking torque, and maximizes pad and rotor life.

DIY – removal and installation of headlights halogen and xenon bulbs

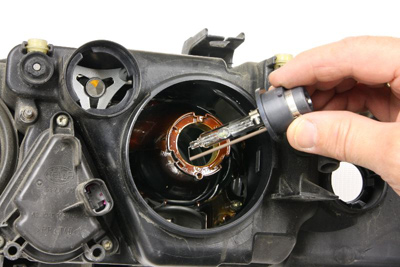
Replacing XENON bulb


Preliminary work

  1. Remove the headlight

Important

  • Switch off ignition and remove ignition key.
  • Switch off the relevant loads when changing bulbs.
  • Only use bulbs listed in the bulb table.
  • Only install clean bulbs that are free of grease.
  • Always use a cloth or soft paper when working with bulbs.
  • Observe the safety instructions when changing a bulb in a Bi-Xenon headlight.
  • In certain states, it is compulsory to carry spare light bulbs.
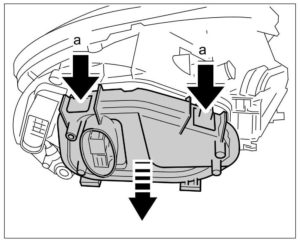
  1. Release and pull off the cover at the two clips -a- .

 hddb1
Opening cover (shown without gas-discharge control unit)

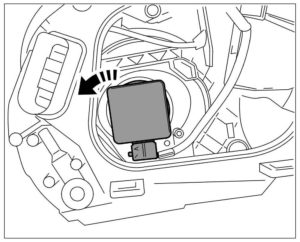
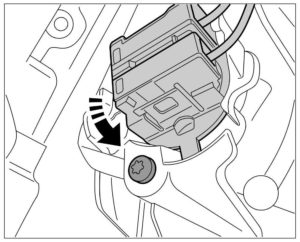
  1. Release gas-discharge headlight by turning once in direction of arrow and carefully remove from the bracket.

 hddb2 
Releasing gas-discharge headlight

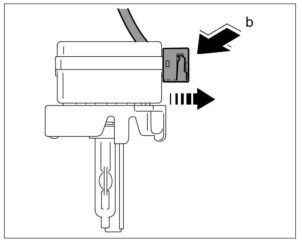
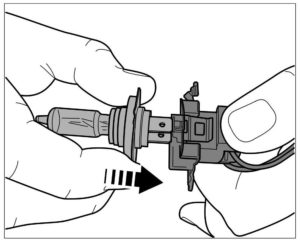
  1. Release and unplug connector -b- .

 hddb3


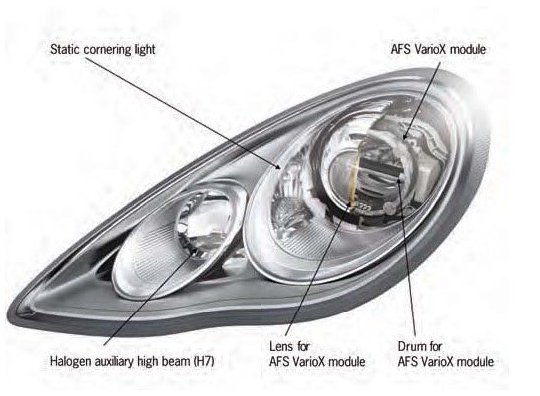
Replacing regular Halogen Bulb

hddb5

hddb6

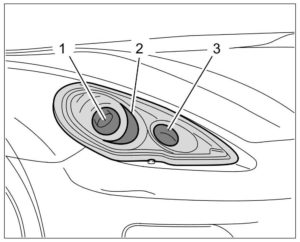
  Remove main headlight.

Removing halogen bulb for high beam headlight

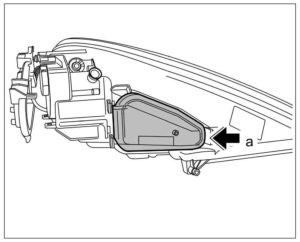
  1. Release the side cover at the clip -a- and open it.

 hddb7

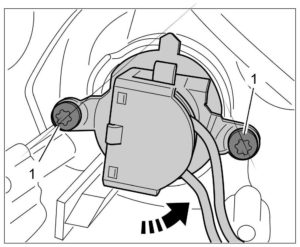
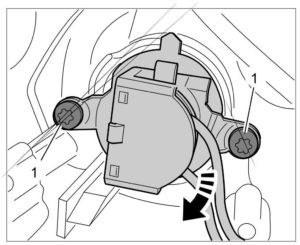
  1. Loosen the two fastening screws -1- used to secure the halogen bulb.

 hddb8

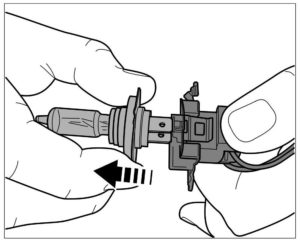
  1. Remove the halogen bulb and socket from the bracket by turning once in direction of arrow.
  2. Unplug connector on halogen bulb.
hddb9


Removing halogen bulb for static cornering light

NOTICE

Incorrect handling of bulb

  1. Release the side cover at the clip -a- and open it.
hddb7
  1. Remove the halogen bulb and socket from the bracket by turning once in direction of arrow.

 hddb10

  1. Unplug connector on halogen bulb.

 hddb9


Installing halogen bulb for high beam headlight

  1. Plug in connector on halogen bulb.

 hddb11

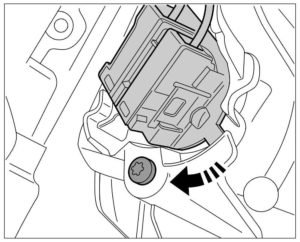
  1. Insert the halogen bulb into the bracket and position it under the two fastening screws by turning once in direction of arrow.

 hddb12

Fitting halogen bulb

  1. Tighten the two fastening screws -1- .
  2. Close the side cover until it engages securely.


Installing halogen bulb for static cornering light

  1. Plug in connector on halogen bulb.
hddb11
  1. Insert halogen bulb and lock it by turning once in direction of arrow.

 hddb13

  1. Close the side cover until it engages securely.

DIY – removal and installation of head lights on Porsche Panamera

WM 941519 Removing and installing main headlights

Information

Risk of damage to headlights due to chafing and excessive temperatures.

Headlights must not be covered when they are switched on, e.g. wing protector or film.

Switch off the ignition.

Removing main headlight

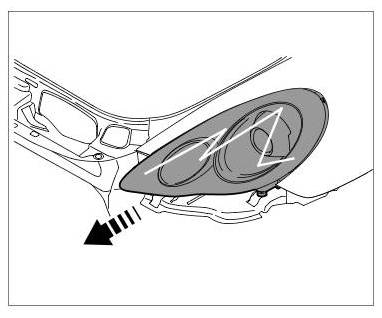
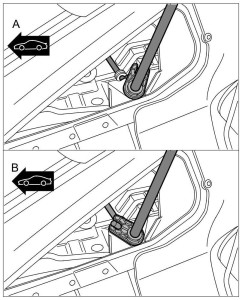
  1. Place the socket wrench from the tool kit on the release axle.


hdd1
  1. Open the locking mechanism by turning the socket wrench.
  2. Pull the main headlight forward until the connector and vent hose are accessible on the back of the main headlight.

 hdd2

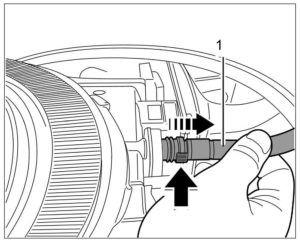
  1. Pull off vent hose -1- .

 hdd3

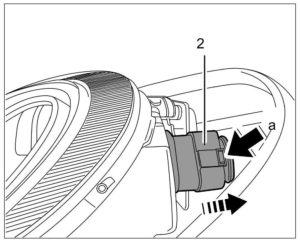
  1. Release and unplug connector -2- on the main headlight -a- .

 hdd4

  1. Remove main headlight.


Installing main headlight

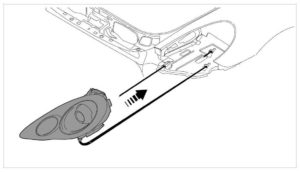
  1. Insert the main headlight into the guide.

 hdd5

All the rest of the steps just do it in reverse.

Headlights and Tail lights explonation

LED Tail Lights

The advantages:

  • Extremely fast response
  • Excellent illumination
  • Greater visibility
  • Energy efficiency
  • Long service life and environmentally friendly

lts2
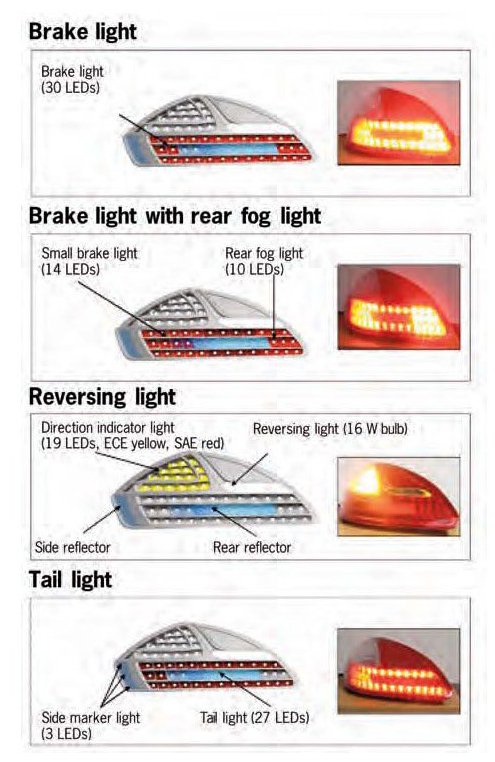
The side marker light with a yellow reflector is integrated into the front apron and the rear direction indicator lights are red in North America and yellow in Europe. The rear fog light only lights up on one side – on the left side for in order to distinguish it more clearly from the brake light. When the rear fog light is on, only the inner 14 LEDs of the 30 LEDs in the brake light are used in order to further differentiate the fog light.


Headlights:


lts3

lts1

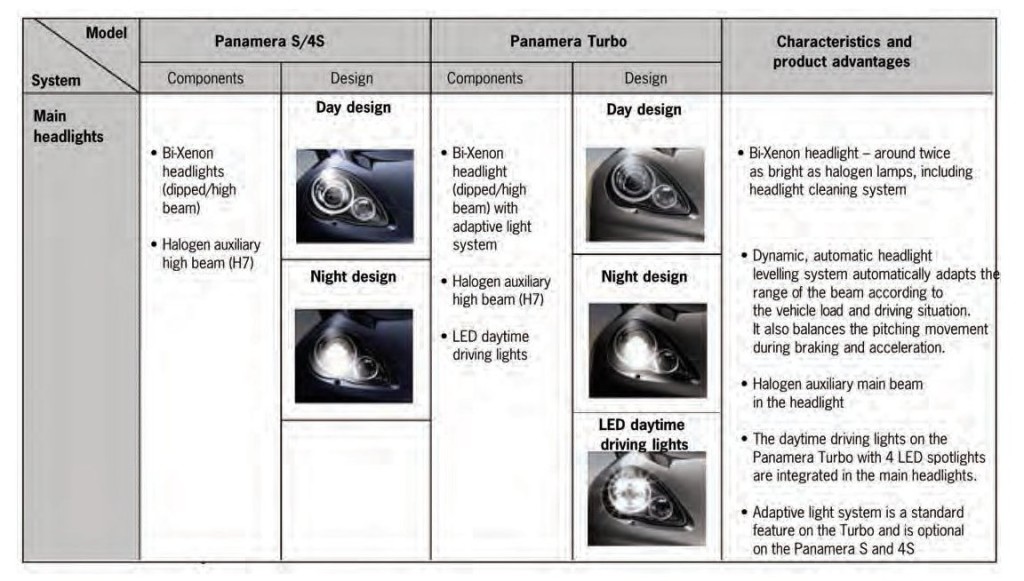
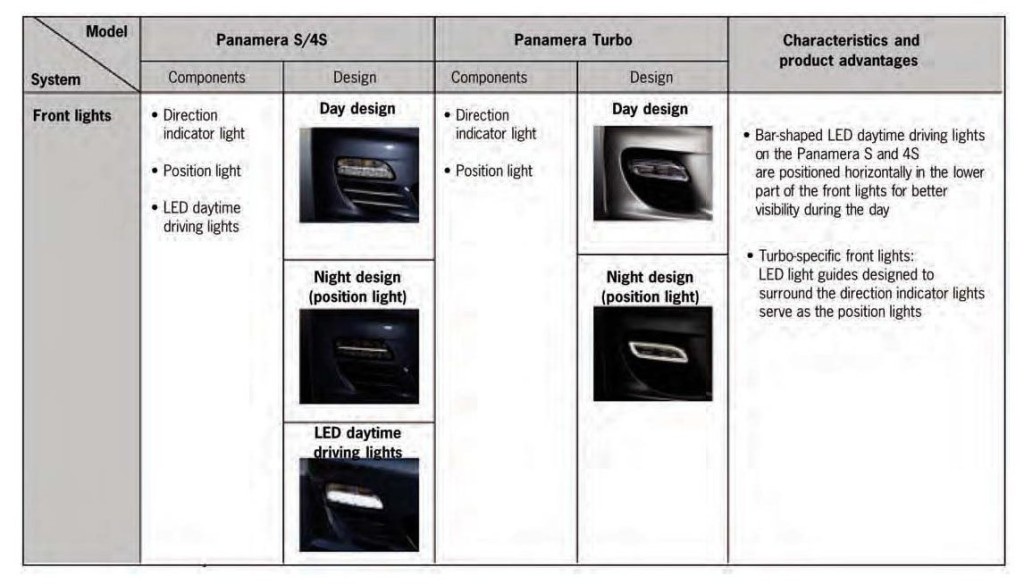
All Panamera models also come with front lights with direction indicator lights and LED position light (bar shaped LED light guides) as standard. On the Panamera S and Panamera 4S, the front lights also house the horizontal, LED-technology daytime driving lights. On the Panamera Turbo, the daytime driving lights – with four LED spotlights each – are located as mentioned earlier in the main headlights. The position light (LED light guides) is designed to surround the direction indicator lights. Daytime running lights increase driving safety during the day by making the vehicle more visible for other road users.

Low beam/driving light

Depending on the light switch position, the low beams are switched on automatically in the following situations: dusk, darkness, driving through tunnels, rain, highway driving

Highway function in bright conditions

The driving light is switched on automatically at speeds of more than approx. 90 mph (140 km/h) in bright conditions and when the daytime running lights are deactivated. When driving at a speed of less than approx. 40 mph (65 km/h), the driving light is switched off after a delay of approx. 4 minutes if the external lighting conditions permit.

Rain function

The driving light is switched on automatically after five seconds of continuous wiper operation. If the wipers have not been used for approx. 4 minutes, the driving light is switched off.

Fog lights

When the fog lights are switched on, the driving light distribution changes at speeds of less than approx. 38 mph (60 km/h). The light beam is widened and glare is reduced.

 lts5

DIY – Rear brake caliper replacment

1. Lift the vehicle. How to lift vehicle safely with air suspension – Here

2. Remove the wheel.

  • Do not open the brake system.
  • Do not loosen the brake hose from the brake caliper when loosening the brake caliper.
  • The core of the warning contact wire must not be left exposed! It does not matter if the insulation is worn.
  • If necessary, remove a little brake fluid from the reservoir by suction in order to prevent an overflow when the disc brake pads are pushed back.
  • To gain better access for removal of the brake caliper, turn the steering fully either to the right or left.
  • Protect brake caliper from paint defects using a suitable cloth
cal11
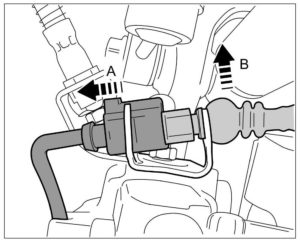
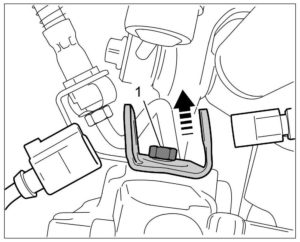
  1. Release and unclip the connector for the brake pad wear indicator -A- and remove it from the holder -B- .
cal12 Connector, brake pad wear indicator
  1. Evenly set back brake pads a little using water pump pliers.
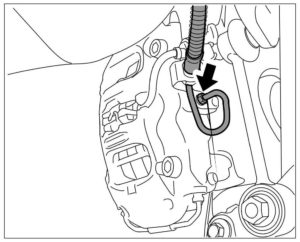
  2. Loosen fastening screw -1- in the holder for the brake pad wear indicator cable and for the brake line from the brake caliper.
cal13Brake line holder
  1. Disconnect the brake line on the brake caliper and collect the brake fluid in a suitable container. => Brake line on brake caliper
cal14Brake line on brake caliper
  1. Close off the brake line with a suitable plug.
  • Never use an impact bolter to loosen and tighten the brake caliper on the wheel carrier.
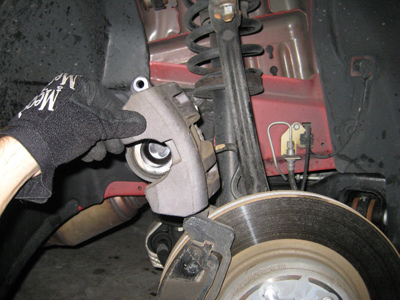
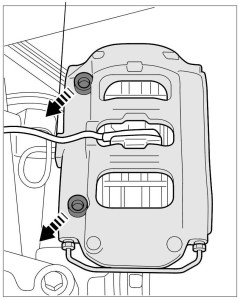
  1. Remove brake caliper from wheel carrier.
cal15Brake caliper fastening screws

Installing rear brake caliper

The brake caliper is installed in reverse order.

  • Replace screws.
  • Never use an impact bolter to loosen and tighten the brake caliper on the wheel carrier.
  • Observe correct tightening torques -> 4X00IN Tightening torques for the brake system
  1. Check that all parts are in perfect condition (visual inspection) and replace them if necessary.
  2. Fit the brake caliper.
  3. Fit the brake line to the brake caliper.
  4. Fit the holder for the brake pad wear indicator cable and for the brake line to the brake caliper.
  5. Clip in the connector for the brake pad wear indicator.
  6. Position disc brake pads by operating the brake several times.

Subsequent work

  1. Bleed the brake system. -> 470107 Bleeding brake system – see Bleeding Panamera Brakes
  2. Fit the wheel. Use assembly aids to help yourself align the holes (assembly pins) .

  
Bedding in the brake parts

New brake pads require a bedding-in period of approx. 200 km (124 miles)! Only then do they achieve their best friction and wear coefficient! During this period, the brakes should only be subjected to full stress at high speed in emergencies! 

Read on: How to bed in your brakes ?