Home Blog Page 14

DIY – removal and installation of rear tail lights

Removing tail light

  • The work steps are described for the left rear door of the vehicle and must be performed in the same way on the other doors. Any different work steps are marked/highlighted.
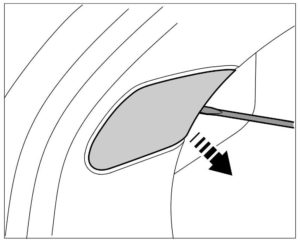
  1. Carefully open the cover in the luggage compartment trim panel using a screwdriver.

 tell1  

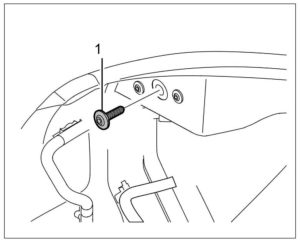
  1. Unscrew fastening screw -1- .

 tell2

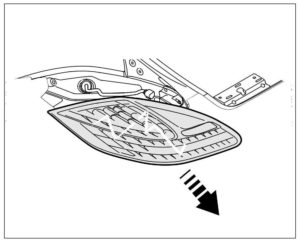
  1. Remove the tail light from the bracket.

 tell3

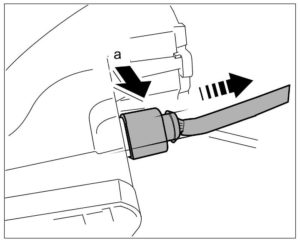
  1. Release -a- and unplug connector (locking mechanism on back of connector).

 tell4


Removing connector

DIY – How to change Oil / filter on a Porsche Panamera


Draining and filling in engine oil (changing engine oil)

OEM Part Number: 94810722200 – $25

oil1


Preliminary work

  • Jack up the vehicle at the points provided.
  • Remove engine underbody panelling.


Draining and filling in engine oil

Information

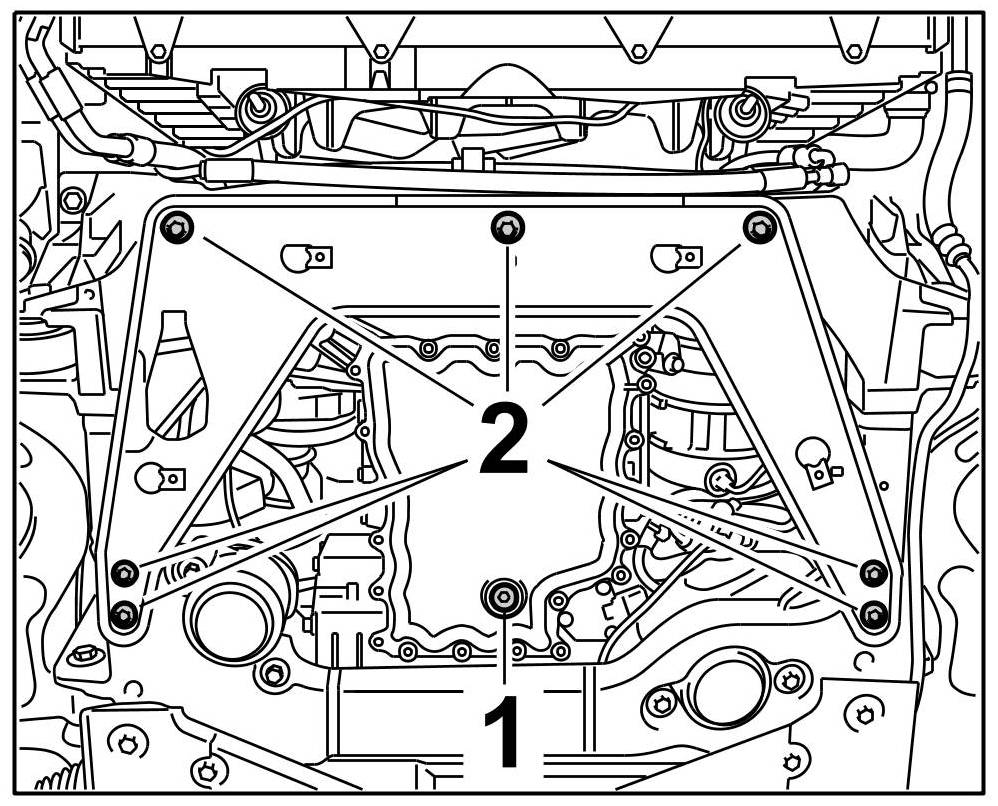
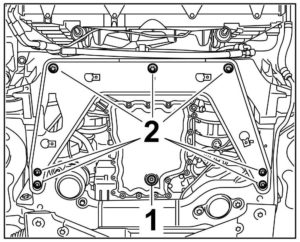
  1. Loosen the oil drain plug -1- and collect the engine oil in a container (allow to drain for approx. 5 minutes). Dispose of waste oil in accordance with legal requirements.
oil2
  1. Replace sealing ring on oil drain plug and fit oil drain plug.
  2. Fill in engine oil of the stipulated viscosity and quality.


  • Oil filling capacity without oil filter V8 => Filling capacity: 8.5 litres
  • Oil filling capacity with oil filter, V8 => Filling capacity: 9.0 litres
  • Oil filling capacity without oil filter, V6 => Filling capacity: 7.7 litres
  • Oil filling capacity with oil filter, V6 => Filling capacity: 8.5 litres


Removing and installing OIL FILTER

Information

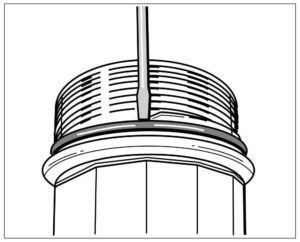
  • Do not remove the sealing ring with a sharp object.
  • The oil filter cover contains a cut-out through which the O-ring can be removed.
  • Position collecting container as close as possible to the oil filter so that no hot oil sprays out at the side!
  • Have sufficient cleaning cloths ready.
  • Cover chassis hoses with cleaning cloths.
  1. Remove the shear panel. -2-
oil2
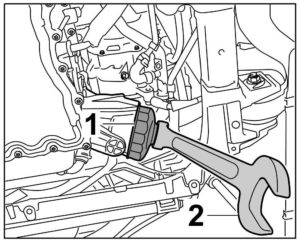
  1. Loosen the oil filter cover -1- with a suitable hexagon socket or ring wrench -2- and unscrew it.
oil4
  1. Slowly open the oil filter cover. Drain the remaining oil into a container.
  2. Remove the filter element. Dispose of the filter in accordance with legal requirements.
  3. Clean the oil filter cover thoroughly inside and outside and replace the sealing ring. Carefully lever off the sealing ring => Cleaning oil filter cover and replacing sealing ring. Do not damage the oil filter cover while doing so.
oil5

  1. First fit the filter element into the oil guide housing.
  2. Lightly oil the sealing ring on the oil filter cover with engine oil. Screw in the oil filter cover and tighten it hand-tight using a suitable ring wrench.
  3. Fit the shear panel -2- . For details of tightening torques, see Chassis.
oil2
  1. Fill in engine oil. The oil filling capacity after removing the oil filter is => Filling capacity: 0.5 litres on a V8 engine and => Filling capacity: 0.8 litres on a V6 engine.


Here are instruction on how one of our readers did it:

To raise the car I went to Home Depot and bought a 2x12x8 piece of framing lumber which I had cut into 8, 1 foot pieces. I jacked each side and stacked 3 of the wood pieces under each tire. The wood is wide enough such that the tires entire width sits on the wood without any chance of slippage. The raised angle isn’t steep so no chance of roll and with tranny in park and chocks on the rear wheels that car didn’t move 1 millimeter. The almost 6″ rise was enough for me to get under enough to reach everything necessary.

The oil change itself was pretty straight forward and the most trouble I had was with the size of the lower engine cover which is almost half the length of the car. I ended up leaving the rear screws holding the cover in place so it would be aligned for lifting and reattaching such that the rest of the cover just rested on the garage floor. It’s flexible enough and the height of the car wasn’t that great so just leaving it that way was fine.

What I learned:
1. I used a Mahle OX 254D4 oil filter which was identical to the dealer installed filter down to the pale lime green color of the filter cap O ring. I’ll use it again next time, it fit perfectly. I got it on Amazon.

2. The drain plug is made of soft aluminum and is a consumable item. I used a 8mm hex socket to remove the plug and the corners of the female hex end of the plug rounded a little in removal. The local auto parts stores had M18 replacement drain plugs but they were all steel and I figured Porsche used aluminum for a reason so I reused the existing plug but next time I’ll have a new one on hand.

3. The plug washer is also aluminum, not crushable copper which I assumed so instead of mixing metals I used a nylon washer this time but again, next time I’ll have the correct one on hand.

4. The local Kragen and Autozone stores had Mobile One 0-40 full synthetic oil for $36.99 for 5 quarts while Walmart and Amazon had it for $26.44 so Walmart won.

5. You need a really, really big wrench to remove the oil cap. The largest socket I have is 28mm and it wasn’t close. Fortunately, my 12″ adjustable wrench just fit the oil cap at max opening. If someone knows the cap bolt head size I’d appreciate posting it but I’m goanna guess about 32mm?

6. The V6 showers 8.9 quarts of oil with filter change. I added about 8.4 quarts to make sure no over fill and took the Pana for a slow speed, low RPM drive for the required 6 miles to set the oil fill gauge. When it came up it showed 1 segment in the green over minimum and “OK” oil level. There were no error messages for the car. I added a few more ounces and will do so as I drive to get to full fill.

Now you need to get the Duramatic tool to reset the oil service light so that’s that. The only reason I might have gone to the dealer one last time is that I have one more year left on my CPO extended warranty but when you get older you want and do want you want, never mind the minor details. If the engine hasn’t blown up yet, I doubt it will do so now.

All about Panamera (TPMS) Tire Pressure Monitoring

Tire Pressure Monitoring (TPM)

The main function of the system is to monitor the tire pressure while driving. The tire pressure is monitored according to axle, tires, vehicle load and speed. The most important additional function offered by the system is the ability to automatically and quickly determine which wheels are mounted and their installation position. The radio telegrams from the wheel electronics units are requested by the control unit as required via the trigger senders. The system recognizes the wheels mounted on the vehicle and their installation positions by evaluating the trigger location and carrying out a statistical analysis of the information received from the wheel electronics units. The tire inflation information is displayed for the driver in the instrument cluster. The individual system components are diagnosed by the control unit.

The most important additional function offered by the TPM system in the Panamera model range is the ability to differentiate between required pressure for comfort and standard required pressure (Vmax required pressure). Another important change relates to the activation of the hard warning.

A “hard” warning in red text is only displayed:

  • if the tire pressure is more than 7 psi (0.5 bar) too low for the speed range from 0 – 100 mph (0 to 160 km/h) and
  • if the tire pressure is more than 6 psi (0.4 bar) too low at speeds of more than 100 mph (160 km/h).

The dynamic warning is no longer used, i.e. no warning is issued when the tire pressure starts to drop quickly within a certain time period. There is a slight time delay before the warning appears if one of the parameters mentioned above comes into effect.

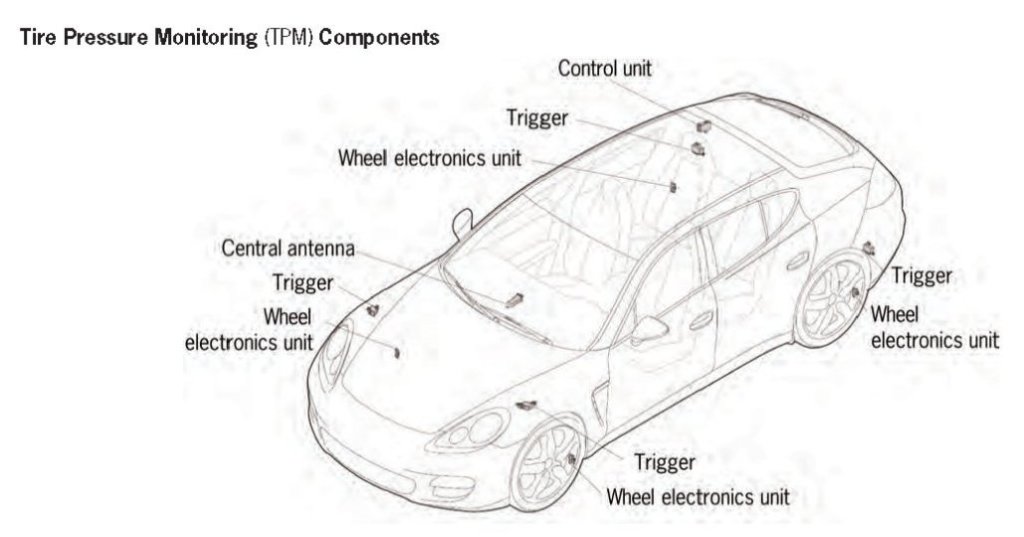
Tire Pressure Monitoring (TPM) Components

tpms


Control Unit
The control unit is located at the right-hand side of the luggage compartment. The control unit analyses the incoming data from the antenna and forwards the relevant information to the instrument cluster. Since the data is transmitted via cable from the central antenna, the control unit is designed to pick up both frequencies (433/315 MHz). If a new control unit is installed, it must be coded accordingly.

Triggers (trigger senders)
The four triggers, which are located under the wheel housing liners in each of the four wheel housings, send a 125 kHz signal directly to the wheel electronics units in order to transmit the desired information to a central antenna immediately. The request to do this comes from the PSM control unit via a PWM signal.

Central Antenna
The digital central antenna (reception frequency 315 or 433 MHz) is mounted to the right side of the vehicle floor. The signals received from the wheel electronics units are digitalized in the antenna and forwarded to the control unit via two lines (LIN bus – Local Interconnect Network).

Wheel Electronics Unit
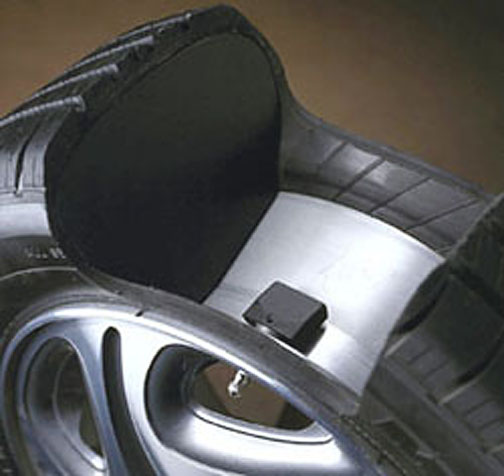
The wheel electronics unit comprises the following components: Pressure sensor, temperature sensor, roll switch, measuring and control electronics, receiver and transmitter as well as a battery.

NOTE: A complete description of the TPM system can be found in the Service Information Technik for the Boxster and Cayman, model year 2009.

Porsche Panamera Brake Parts and Replacement

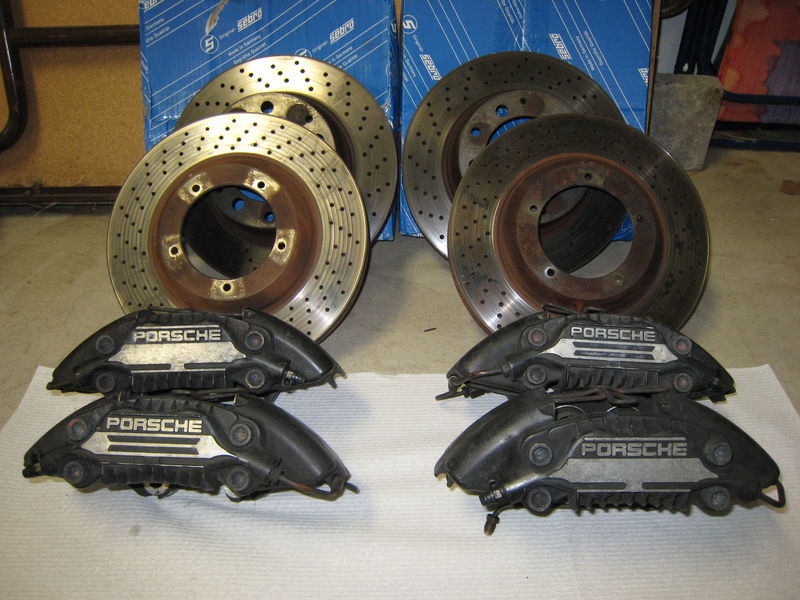
Brake Assembly Part Numbers


Front Caliper Assembly Without Ceramic Brakes

Right Part# 7PP615150E $771.19
Left Part# 7PP615149E $771.19


Front Caliper Assembly With Ceramic Brakes

Right Part# 7PP615124T $880.89
Left Part# 7PP615149L $880.89


Rear Caliper Assembly Without Ceramic Brakes

Right Part# 97035242604 $627.11
Left Part# 97035242503 $627.11


Rear Caliper Assembly With Ceramic Brakes

Right Part# 97035242634 $707.75
Left Part# 97035242534 $707.75


Brake Pads and Rotors


FRONT Brake Pads

Without Ceramic Brakes Part# 97035194904 $322.48
With Ceramic Brakes Part# 97035194803 $340.90


REAR Brake Pads

Without Ceramic Brakes Part# 97035294904 $227.62
With Ceramic Brakes Part# 97035294703 $275.53


FRONT Rotors

Without Ceramic Brakes Part# 97035140600 $759.82
With Ceramic Brakes Part# 97035140832 $4499.92


REAR Rotors

Without Ceramic Brakes Part# 97035240600 $290.66
With Ceramic Brakes Part# 99735203201 $4036.35


Zimmerman Rotors:

Front Left (Driver): 2010-2016 Porsche Panamera turbo (excl. PCCB/I450 kit), Zimmermann Front Left Rotor Hi Carbon, Coat-Z, PN: 55433KX 2011, Price: $304

Front Right (Pass): 2010-2016 Porsche Panamera turbo (excl. PCCB/I450 kit), Zimmermann Front Right Rotor Hi Carbon, Coat-Z, PN: 38392ZP 2011, Price: $305

Rear Left (Driver): 2010-2016 Porsche Panamera turbo (excl. PCCB/I450 kit), Zimmermann Rear Left Rotor, Coat-Z Anti Corrosion, PN: 58791XT 2011, Price: $167

Rear Right (Pass): 2010-2016 Porsche Panamera Turbo (excl. PCCB/I450 kit), Zimmermann Rear Right Rotor, Coat-Z Anti corrosion, PN: 89321PZ 2011, Price: $151


DIY – Removing and installing front wheel housing liner / wheel well cover

Removing REAR section of front wheel housing liner

Information

  • Some of the repair illustrations show only one side of the vehicle.
  • Naturally, some steps also have to be performed on the opposite side of the vehicle as well.
  • These must be carried out as a mirror image of the steps shown.
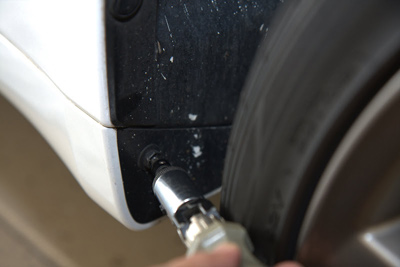
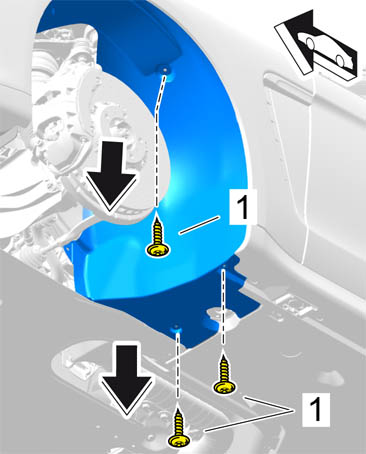
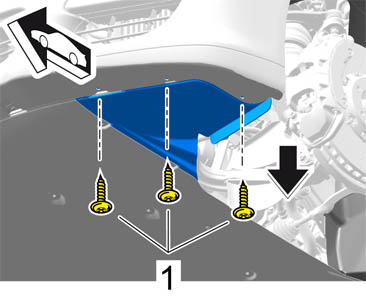
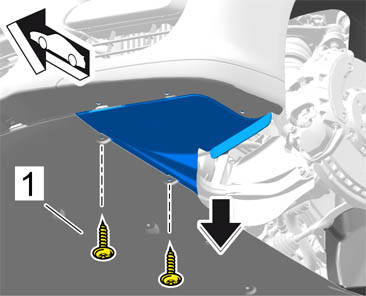
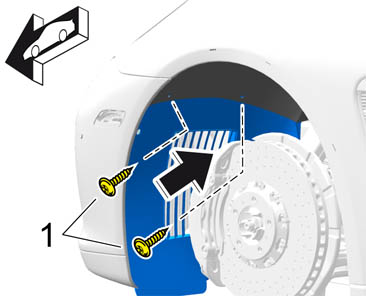
  1. Unscrew fastening screws -1- for the wheel housing liner at the underbody.
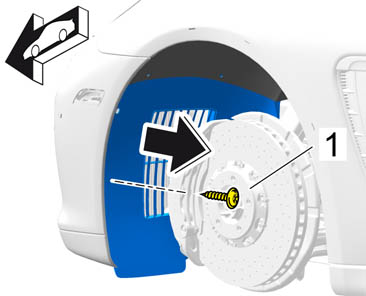
  2. Unscrew fastening screw -1- on the inside of the wheel housing liner.
10_Schrauben an RHS vorne-hinten innen_C v2Mounting point for rear section of wheel housing liner
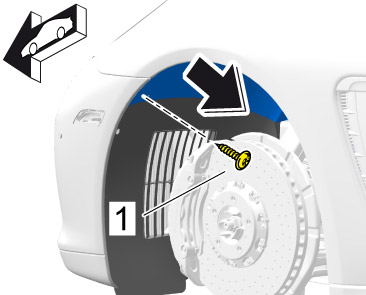
  1. Unscrew fastening screw -1- on the outside of the front apron.
fd2Mounting point for rear section of wheel housing liner on front apron
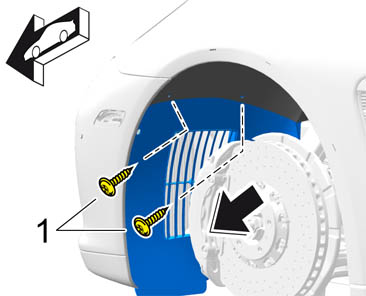
  1. Unscrew fastening screws -1- securing rear section of wheel housing liner to the front section of the wheel housing liner.
06_Schrauben an RHS seitlichMounting point for rear section of wheel housing liner on front section
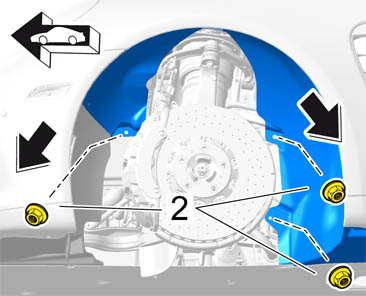
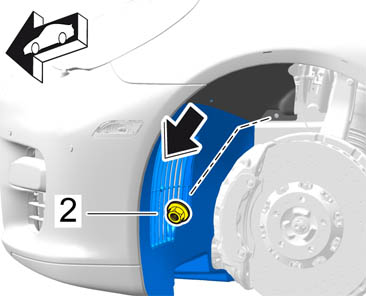
  1. Unscrew plastic nuts -2- on the inside of the wheel housing liner.
08_Schrauben an RHS vorne-hinten innen_A v3Mounting point on inside of wheel housing liner
  1. Remove wheel housing liner.


Removing FRONT section of front wheel housing liner

  1. Unscrew fastening screws -1- on the front apron.
01_Schrauben an RHS vorne-vorne unten_AMounting point for front wheel housing liner on front apron
  1. Unscrew fastening screws -1- securing wheel housing liner to front underbody panelling.

01_Verkleidung unten seitlich

Mounting point for front wheel housing liner on underbody panelling

  1. Unscrew fastening screw -1- securing wheel housing liner to front apron.
03_Schrauben an RHS vorne-vorne seitlich

Mounting point for front wheel housing liner on front apron

  1. Unscrew plastic nut -2- securing front section of wheel housing liner to rear section of wheel housing liner.
05_Schrauben an RHS vorne-vorne innen

Mounting point for front section of wheel housing liner to rear section

  1. Unscrew fastening screws -1- securing front section of wheel housing liner to rear section of wheel housing liner.
06_Schrauben an RHS seitlich

Mounting point for front section of wheel housing liner to rear section

  1. Remove wheel housing liner.